Sure! Strapping a sleeping bag to your roof rack can be a convenient and efficient way to transport it during your outdoor adventures. To ensure that it is securely attached and doesn’t pose any safety risks, there are a few steps you can follow.
Firstly, it is essential to choose the right type of straps for this task. Look for straps that are durable and have a high weight capacity to support the weight of the sleeping bag. Once you have the appropriate straps, start by laying the sleeping bag flat on the roof rack. Take one end of the strap and secure it tightly around the sleeping bag, ensuring that it is snug and won’t come loose during the journey. Repeat this process with the other end of the strap, making sure it is tightly fastened as well. Finally, check all the straps to ensure they are secure and tighten them if necessary. By following these steps, you can have peace of mind knowing that your sleeping bag is securely strapped to your roof rack and ready for your next adventure. Happy travels!
Choosing the Right Straps
Consider Strap Material and Strength
When it comes to securing your sleeping bag to your roof rack, choosing the right straps is crucial. Look for straps made from durable materials such as nylon or polyester, as they are known for their strength and weather resistance. These materials ensure that your sleeping bag stays securely in place throughout your journey, even in challenging weather conditions. Additionally, consider the weight and size of your sleeping bag and select straps with appropriate load-bearing capacity.
Select Straps with Reliable Buckles
The buckles play a vital role in keeping your sleeping bag tightly secured to the roof rack. Opt for straps with sturdy and reliable buckles that can withstand tension and pressure. Look for buckles made from materials like stainless steel or heavy-duty plastic, as they provide durability and longevity. Additionally, ensure that the buckles have a secure locking mechanism to prevent accidental loosening during travel.
Ensure Sufficient Length for Securing Sleeping Bag
Before purchasing straps for your roof rack, make sure they are long enough to securely fasten your sleeping bag. Measure the length and width of your bag and consider any additional padding or accessories you may need to secure along with it. Having straps of appropriate length will allow you to create a tight and secure fit, minimizing the risk of movement or slippage during transportation.
Preparing the Roof Rack

This image is property of www.etrailer.com.
Inspect Roof Rack for Damage or Loose Parts
Ensuring the safety of your sleeping bag starts with inspecting your roof rack. Before even thinking about securing your sleeping bag, thoroughly examine the roof rack for any signs of damage, such as cracks, rust, or loose components. Address any issues promptly to avoid compromising the stability and security of your belongings during travel.
Clean the Roof Rack Surface
A clean surface provides better grip and ensures the longevity of your straps. Before attaching any straps, take a few moments to clean the roof rack surface. Remove any dirt, dust, or debris that could affect the straps’ grip or cause scratching or damage to your sleeping bag. A simple wipe-down with a clean cloth should be sufficient, but for more stubborn dirt, consider using mild soap and water.
Stabilize Any Loose or Moving Components
A stable roof rack is essential for safe and secure transport. If you notice any loose or moving components on your roof rack, take the time to stabilize them before attaching your sleeping bag. Tighten screws, bolts, or other fasteners that may have become loose over time. This step ensures that the roof rack remains sturdy throughout your journey, minimizing the risk of the sleeping bag shifting or falling during transit.
Packing the Sleeping Bag

This image is property of www.etrailer.com.
Roll Up Sleeping Bag Tightly
Properly packing your sleeping bag is essential for securing it to your roof rack. Begin by rolling up your sleeping bag tightly from one end to the other, making sure to expel any excess air as you go. This compact roll will not only save space but also minimize the risk of the sleeping bag unraveling or shifting during transportation.
Use Compression Straps if Available
If your sleeping bag comes with built-in compression straps or if you have separate compression straps, utilize them to further secure the tightly rolled bag. Compression straps help to create an even more compact bundle, reducing the chances of the sleeping bag coming undone or sliding during travel. Follow the manufacturer’s instructions to ensure proper usage and tension.
Consider Using a Waterproof Stuff Sack
Protecting your sleeping bag from water and moisture is vital to maintain its quality and comfort. Consider using a waterproof stuff sack for an additional layer of protection. Place the tightly rolled sleeping bag inside the stuff sack and ensure a tight closure. This precaution provides peace of mind, especially if you encounter unexpected rain or wet conditions during your journey.
Positioning the Sleeping Bag

This image is property of i.ytimg.com.
Place the Sleeping Bag on the Roof Rack
Positioning your sleeping bag on the roof rack requires careful consideration. Start by placing the rolled-up sleeping bag onto the rack, ensuring that it sits flat and centered. Take note of any other items or equipment already secured to the roof rack, as their placement may affect the positioning of the sleeping bag.
Arrange the Sleeping Bag Horizontally or Vertically
The orientation of your sleeping bag on the roof rack depends on various factors, such as the roof rack’s size and the overall space availability. You can choose to arrange the sleeping bag horizontally or vertically, whichever allows for the most secure and aerodynamic fit. Experiment with different orientations to find the one that best suits your specific roof rack setup.
Center the Sleeping Bag on the Roof Rack
Regardless of the orientation you choose, always strive to center the sleeping bag on the roof rack. This balanced placement ensures weight distribution and stability during travel. Maintaining a centered position reduces the risk of the sleeping bag shifting or affecting driving dynamics, providing a safer and more comfortable journey.
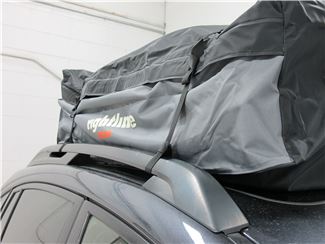
Securing the Sleeping Bag

This image is property of www.etrailer.com.
Thread the Straps Through Roof Rack Crossbars
Loop the straps through the crossbars of your roof rack. This step allows you to create a solid anchor point for securing the sleeping bag. Pay close attention to the position of the crossbars and ensure that the straps are threaded correctly, with no twists or knots that may compromise their strength or functionality.
Create a Secure Loop Around the Sleeping Bag
Wrap the straps around the tightly rolled sleeping bag, creating a secure loop or lashing. Start with one strap and adjust it snugly around the bag, making sure it is tightly secured without crushing the bag’s insulation or fabric. Repeat the process with additional straps if necessary, evenly distributing the tension and ensuring a stable hold.
Tighten the Straps Firmly but Avoid Over-tightening
Tightening the straps is crucial for a secure fit, but it’s important to find the right balance. Firmly tighten the straps enough to prevent any movement or slippage of the sleeping bag during transit. However, avoid over-tightening, as this may put excessive strain on the roof rack or cause unnecessary compression of the sleeping bag. Use your judgment to ensure a snug and secure attachment.
Crossing the Straps

This image is property of valleyproud.org.
Cross the Straps over the Sleeping Bag
For added security, consider crossing the straps over the sleeping bag once they are in place. This crossover creates additional tension and helps distribute the weight more evenly. Start by identifying the straps that will cross and carefully place them over the sleeping bag, forming an ‘X’ pattern. Ensure that the crossover occurs at a point where the straps are tightly wrapped around the bag.
Ensure Proper Tension and Symmetry
When crossing the straps, pay attention to maintaining proper tension and symmetry. Both straps should feel equally tight and secure, with no excessive tension on one side. Achieving balanced tension helps prevent any shifting or imbalance during travel. Take a moment to adjust and fine-tune the strap tension to ensure optimal stability.
Use a Secure Knot or Buckle
To secure the crossed straps, use a reliable knot or buckle system. Double-check that the chosen method can withstand the tension and forces that may occur during your journey. If using knots, ensure they are tied securely and won’t come undone during travel. If using buckles, engage them properly to prevent accidental loosening. The chosen method should provide confidence in the security of the sleeping bag attachment.
Double-Checking the Security
Inspect the Straps for Tightness
Before hitting the road, it’s crucial to perform a thorough inspection of the straps. Check each strap to ensure it is still tight and properly secured. Make any necessary adjustments or re-tighten any straps that may have loosened during the packing or positioning process. Taking this extra step helps avoid unexpected movement or slippage of the sleeping bag during transit.
Check for Any Movement or Slippage
Give the sleeping bag a gentle tug to test its stability. Check if there is any noticeable movement or slippage. If you detect any issues, reassess the strap tension, reposition the sleeping bag if needed, or consider using additional securing methods such as extra straps or bungee cords. Ensuring the sleeping bag remains secure throughout your trip is essential for both your safety and the protection of your belongings.
Re-tighten if Necessary
During your journey, vibrations, wind, or other external factors may cause the straps to slightly loosen. Periodically check the strap tension and security during stops or whenever it is safe to do so. If you notice any slack or easing of the straps, re-tighten them as required. Regularly re-checking and adjusting the straps guarantees the sleeping bag remains securely fastened, granting you peace of mind.
Protecting the Sleeping Bag
Cover the Sleeping Bag with a Tarp or Rain Fly
Even with the sleeping bag securely fastened, external elements can still pose a threat. To provide an extra layer of protection, cover the sleeping bag with a tarp or rain fly. This protective covering shields the sleeping bag from rain, dust, and other potential sources of dirt or damage. Ensure the tarp or rain fly is tightly secured to the roof rack to prevent it from flapping or coming loose during travel.
Use Bungee Cords to Secure the Covering
Stabilize the tarp or rain fly by using bungee cords or similar fastening methods. These cords help keep the covering in place, maintaining its protective function even when facing strong winds or sudden vehicle movements. Attach the bungee cords securely to the roof rack or other secure points, making sure they provide adequate tension without causing any strain or damage to the sleeping bag or the roof rack.
Ensure the Sleeping Bag is Well-Protected from Elements
Before embarking on your journey, ensure that the sleeping bag and its covering are well-protected from the elements. This includes checking that the tarp or rain fly is securely attached and covers the entire sleeping bag without any gaps or exposed areas. Take a moment to adjust the covering if necessary, ensuring optimal protection against rain, dust, debris, or any other potential hazards along the way.
Testing the Stability
Shake the Roof Rack to Verify Stability
Once everything is in place, give the roof rack a gentle shake to test the stability of the sleeping bag. Observe for any signs of movement, slippage, or inadequate fastening. If you notice anything amiss, reevaluate and adjust the straps accordingly. This simple test helps ensure that the sleeping bag is securely attached and will not shift or come loose during your journey.
Take a Short Test Drive to Check Security
To further assess the security of the sleeping bag, take a short test drive before embarking on your actual trip. Drive over various road surfaces, including bumps and turns, to mimic the conditions you may encounter during your journey. Pay close attention to any vibrations, noise, or unexpected movements. If you notice anything concerning, pull over safely and readjust the straps as needed.
Make Adjustments if the Sleeping Bag Shifts
During the test drive, if you notice that the sleeping bag shifts or moves significantly, it may indicate an issue with the attachment. Pull over safely to a suitable location and address the problem. Reevaluate the strap tension, the positioning of the sleeping bag, or consider using additional securing methods such as more straps or bungee cords. It’s important to ensure a stable and secure attachment before continuing your journey.
Arriving at Your Destination
Check Straps and Security before Unloading
Once you arrive at your destination, take a moment to inspect the straps and overall security of the sleeping bag before unloading. Ensure that the straps remain tight and properly fastened. Double-check for any signs of movement or slippage that may have occurred during the trip. By verifying the straps’ integrity before unloading, you can address any potential issues promptly and avoid any surprises.
Gently Remove the Straps and Sleeping Bag
When removing the straps, do so carefully and gently to prevent any damage or sudden movements. Loosen the straps gradually and remove them from the roof rack, keeping a firm grip on the sleeping bag to avoid dropping it. Place the straps aside for future use, making sure they are kept clean and in good condition.
Store the Sleeping Bag Properly for Future Use
Once the sleeping bag is safely removed from the roof rack, store it properly to maintain its longevity and quality. If using a stuff sack or compression bag, roll the sleeping bag tightly and place it back inside. Store the sleeping bag in a dry and clean space, away from direct sunlight or extreme temperatures. Proper storage ensures that your sleeping bag stays in optimal condition for your future camping adventures.
In conclusion, securing a sleeping bag to your roof rack requires careful consideration and attention to detail. By choosing the right straps, preparing the roof rack, packing the sleeping bag correctly, and following the appropriate securing techniques, you can travel confidently, knowing your sleeping bag is safe and secure. Regularly inspecting and adjusting the straps, protecting the sleeping bag from external elements, and periodically testing the stability throughout your journey will further enhance the security and peace of mind. Remember to always prioritize safety and take the necessary precautions to safeguard yourself, your passengers, and your belongings when traveling with a roof-mounted sleeping bag.