If you’ve ever struggled to transport large items on road trips, then installing a cargo bag on a roof basket could be the solution you’ve been searching for. This step-by-step guide will walk you through the process, making it easy for you to securely attach a cargo bag to your roof basket and hit the road with confidence. Say goodbye to cramped car interiors and hello to extra storage space for all your adventure gear!

This image is property of media.pelican.com.
Step 1: Gather the necessary tools and materials
Before you can start installing a cargo bag on your roof basket, it is essential to gather the necessary tools and materials. Here is a list to ensure you have everything you need:
List of tools:
- Screwdriver (if required)
- Allen wrench (if required)
- Adjustable wrench (if required)
- Scissors
- Cleaning cloth
- Tape measure
- Zip ties (if required)
List of materials:
- Roof basket
- Cargo bag
- Straps or tie-downs (usually provided with the cargo bag)
- Fasteners or additional straps (if needed)
Make sure you have all these tools and materials readily available before proceeding to the next step.
Step 2: Prepare the roof basket
Before installing the cargo bag, it is crucial to prepare the surface of your roof basket. Follow these steps to ensure a clean and secure foundation:
Clean the roof basket:
Start by carefully removing any debris or dirt from the roof basket. Use a cleaning cloth or brush to gently scrub away any stubborn dirt or grime. Cleaning the roof basket will ensure that the cargo bag attaches securely and does not get damaged by loose particles.
Inspect the roof basket:
After cleaning the roof basket, carefully inspect it for any signs of damage or wear. Check for any loose or broken parts that may compromise the stability of the cargo bag. If you notice any issues, address them before proceeding with the installation.
Step 3: Position the cargo bag on the roof basket
Now that your roof basket is clean and ready, it’s time to position the cargo bag securely. Follow these steps for proper placement:
Determine the placement:
Consider the size and shape of the cargo bag, as well as the size of your roof basket. Ensure that the cargo bag fits comfortably on the roof basket without obstructing your vision or interfering with any vehicle components. Also, keep in mind any weight restrictions specified by the manufacturer.
Align the cargo bag on the roof basket:
Place the cargo bag onto the roof basket, ensuring that it is centered and aligned correctly. Take the time to adjust the bag’s position to achieve a balanced and symmetrical appearance. This will not only improve the aesthetics but also enhance the overall stability during transportation.
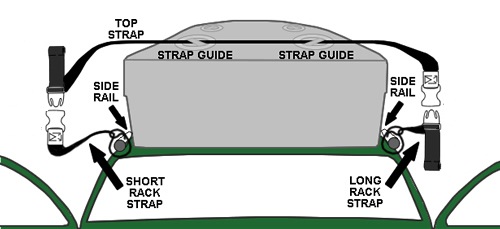
Step 4: Secure the cargo bag to the roof basket
Now that the cargo bag is properly positioned, it’s time to secure it tightly to the roof basket. Follow these steps for a secure attachment:
Attach the straps:
Most cargo bags come with built-in straps or tie-downs. Locate these straps and attach them to the roof basket’s anchor points or directly to the roof rails (if applicable). Make sure to distribute the straps evenly, ensuring a balanced and secure attachment.
Tighten the straps:
Once the straps are attached, tighten them securely. Use the adjustable buckles or fasteners provided with the cargo bag to achieve a tight fit. Ensure that the cargo bag is held firmly in place without any noticeable movement. Tight straps will prevent the bag from shifting or coming loose during transit.

This image is property of i.ytimg.com.
Step 5: Test the stability
Ensuring the stability of the cargo bag is crucial to prevent any accidents or damage to your vehicle. Follow these steps to test the secure attachment:
Shake and rock the cargo bag:
Stand beside your vehicle and gently shake or rock the cargo bag from different angles. Observe if there is any excessive movement or shifting of the bag. A stable cargo bag should remain firmly attached without any noticeable wiggle.
Ensure it is securely attached:
After shaking and rocking the cargo bag, thoroughly inspect the attachment points and straps. Confirm that everything is still tightly secured and that the cargo bag has not become loose. If any adjustments are required, re-tighten the straps accordingly to ensure a safe and secure installation.
Step 6: Load the cargo into the bag
Now that the cargo bag is securely attached to your roof basket, it’s time to load it with your belongings. Follow these steps for efficient and safe packing:
Organize and pack the items:
Carefully organize your belongings and pack them inside the cargo bag. Utilize any compartments or pockets within the bag to maximize space and keep items separate. Pack heavier items towards the bottom to ensure the weight is evenly distributed.
Distribute the weight evenly:
As you load your items into the cargo bag, distribute the weight evenly to maintain stability during transit. Avoid overloading one side or corner of the bag, as this can affect the balance and potentially cause the cargo bag to shift or become unstable.

This image is property of i.ytimg.com.
Step 7: Close and secure the cargo bag
After loading all the necessary items into the cargo bag, it’s time to secure it closed. Follow these steps to ensure a tight closure:
Zip up the bag:
Locate the zipper on your cargo bag and carefully zip it closed. Ensure that the zipper is fully engaged and aligned. Double-check that there are no gaps or openings that may allow water or debris to enter the bag during transit.
Use additional fasteners:
If your cargo bag comes with additional fasteners or straps, utilize them for added security. Attach any provided buckles, clips, or Velcro fasteners to further tighten and secure the bag’s closure. These additional fasteners will provide an extra layer of protection, especially during long trips or adverse weather conditions.
Step 8: Check for any loose parts
Before hitting the road, it’s essential to check for any loose parts or items that may compromise the safety of your cargo bag installation. Follow these steps to ensure a secure setup:
Inspect the straps:
Carefully inspect all the straps and tie-downs connected to the cargo bag and the roof basket. Make sure they are still tightly secured and have not become loose during the loading process. If any straps appear loose, re-tighten them to enhance the stability of the cargo bag.
Ensure no items are hanging:
Check if any items are hanging outside the cargo bag or over the sides of the roof basket. These loose items can pose a hazard to other drivers and may potentially fall off during transit. Secure any loose ends, tuck them inside the cargo bag, or consider rearranging the items to prevent any accidents.

This image is property of i.ytimg.com.
Step 9: Verify clearance with the vehicle
Before you hit the road, it’s crucial to verify that the cargo bag installation has appropriate clearance with your vehicle. Follow these steps for a thorough check:
Check for any contact with the car:
Walk around your vehicle and carefully inspect if the cargo bag comes into contact with any part of the car’s body. Pay close attention to side mirrors, antennas, and rooftop components. Adjust the position of the cargo bag if necessary to ensure there is ample clearance and no risk of damage to your vehicle.
Test different angles and movements:
To ensure a safe and secure cargo bag installation, test the clearance at different angles and movements. Make sure to simulate various scenarios, such as turning, braking, and accelerating, to ensure that the cargo bag remains clear of any contact with the vehicle.
Step 10: Properly maintain the cargo bag and roof basket
To ensure the longevity and functionality of your cargo bag and roof basket, proper maintenance is essential. Follow these steps to keep them in tip-top shape:
Clean and store the bag:
Regularly clean the cargo bag using mild soap, water, and a soft brush. Thoroughly rinse and allow it to dry before storing it. When not in use, store the bag in a cool, dry place to prevent damage from moisture or extreme temperatures.
Regularly inspect and tighten the fittings:
Periodically inspect the fittings and attachments of the cargo bag and roof basket to ensure they remain tight and secure. Check for any signs of wear or damage and address them promptly. Regular maintenance and tightening of fittings will prevent any unexpected failure during transportation.
By following these step-by-step instructions, you can successfully install a cargo bag on your roof basket. Remember to always prioritize safety, secure the cargo properly, and regularly inspect and maintain the installation to ensure a smooth and worry-free journey. Happy travels!

This image is property of www.roofbag.com.