Welcome to our step-by-step guide on how to install a Highland Roof Bag! In this article, you will learn all the necessary steps to successfully install a Highland Roof Bag on your vehicle. By following these simple instructions, you will be able to maximize your storage capacity and enjoy hassle-free road trips.
First, ensure that your vehicle has a roof rack installed. This is a crucial step as the Highland Roof Bag needs a stable base to be attached to. Once you have confirmed the presence of a roof rack, locate the four straps that come with the roof bag. These straps will be used to securely fasten the bag to the roof rack. Next, carefully position the bag on top of the roof rack, making sure it is centered and aligned. Wrap each strap around the roof rack, making sure they are tight enough to secure the bag in place. Repeat this process for all four straps, ensuring that they are evenly spaced and tightly secured. And voila! You have successfully installed your Highland Roof Bag and are now ready to hit the road with all your extra gear conveniently stored and protected on your vehicle’s roof. Enjoy your adventure!
Step-by-Step Guide: Installing a Highland Roof Bag
Have you ever found yourself in need of extra storage space during trips or vacations? Whether it’s for camping gear, sports equipment, or just extra luggage, a roof bag can be the perfect solution. With its ability to attach to your vehicle’s roof, it provides a convenient and secure storage option. In this step-by-step guide, we will walk you through the process of installing a Highland Roof Bag, ensuring a hassle-free installation every time.
Step 1: Choosing the Right Roof Rack
Before you begin installing your Highland Roof Bag, it’s essential to ensure that you have the right roof rack for your vehicle. Roof racks come in various shapes and sizes, so it’s crucial to choose one that is compatible with your vehicle’s make and model. Refer to your vehicle’s manual or consult with a professional to determine the ideal roof rack for your specific needs.
Step 2: Preparing the Roof Bag
Checking for any damages or defects
Before installing your Highland Roof Bag, take some time to inspect it for any damages or defects. Look for any tears, holes, or worn-out areas that may compromise the bag’s integrity. It’s essential to address any issues before installation to prevent further damage or potential loss of your belongings while on the road.
Cleaning the roof bag
Ensure that your Highland Roof Bag is clean before installation. Remove any dust, dirt, or debris that may have accumulated on its surface. You can use a mild detergent mixed with water and a soft brush to gently scrub the bag. Be sure to rinse it thoroughly and allow it to air dry before proceeding with the installation.
Folding and organizing the straps
To prevent any tangling or confusion later on, take a moment to fold and organize the straps of your Highland Roof Bag. This will make it easier to attach and secure the bag to the roof rack later in the process. Neatly fold the straps and secure them in place using Velcro strips or ties.

This image is property of www.roofbag.com.
Step 3: Preparing the Vehicle
Removing any existing cargo or accessories from the roof
Before installing your Highland Roof Bag, remove any existing cargo or accessories from the roof of your vehicle. This includes bike racks, kayak carriers, or any other objects that may obstruct the installation process. Clearing the roof will provide a clean and unobstructed surface for attaching the roof rack.
Installing the roof rack onto the vehicle
Once the roof of your vehicle is clear, it’s time to install the roof rack. Follow the manufacturer’s instructions for your specific roof rack model, ensuring that it is correctly attached and secured. Double-check the tightness of the bolts or screws to guarantee a stable and secure base for your Highland Roof Bag.
Step 4: Attaching the Roof Bag to the Roof Rack
Positioning the roof bag on the roof rack
With the roof rack securely installed, it’s now time to position your Highland Roof Bag on top of it. Carefully lift the bag and place it onto the roof rack, ensuring that it is centered and aligned with the vehicle. Take a step back and visually confirm that the bag is positioned correctly before proceeding to secure it.
Securing the bag using the provided straps or clips
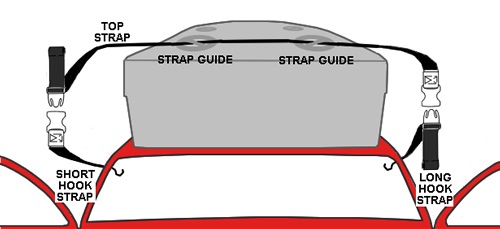
Highland Roof Bags typically come with straps or clips designed to secure the bag to the roof rack. Attach these straps or clips to the designated anchor points on the bag and the roof rack. Tighten them securely, ensuring that the bag is held firmly in place. Avoid overtightening, as this may damage the bag or the roof rack.

This image is property of www.roofbag.com.
Step 5: Ensuring Proper Fastening
Double-checking the tightness of the straps or clips
After securing the bag to the roof rack, double-check the tightness of the straps or clips. Give them a gentle tug to ensure that they are properly fastened and will not come loose during your journey. It’s essential to have a secure and stable installation to prevent any accidents or damage to your belongings.
Adjusting the tension to ensure a secure fit
If necessary, adjust the tension of the straps or clips to achieve a secure fit. The bag should be firmly attached to the roof rack without any wobbling or looseness. However, take care not to overtighten, as this may strain the straps or clips and potentially cause them to break. Finding the right balance is key to a successful installation.
Step 6: Loading the Roof Bag
Placing items inside the bag
With your Highland Roof Bag securely attached, it’s time to start loading your belongings. Place your items inside the bag, taking care to distribute the weight evenly. Start with larger and bulkier items first, positioning them towards the center to maintain balance. Avoid overloading the bag and exceeding the recommended weight limit provided by the manufacturer.
Distributing the weight evenly
To ensure a safe and stable journey, it’s essential to distribute the weight of your items evenly inside the Highland Roof Bag. This will help maintain balance and prevent unnecessary strain on the roof rack and the bag itself. Place heavier items towards the center and distribute lighter items around them, creating a well-balanced load.
Securing loose items with additional straps or nets
For added security, consider using additional straps or nets to secure any loose items inside the Highland Roof Bag. This will prevent movement or shifting of the items during transit, ensuring that they remain in place throughout your journey. Take extra care to fasten any potentially dangerous or fragile items securely.

This image is property of www.roofbag.com.
Step 7: Closing and Securing the Roof Bag
Zippering the bag closed
Before hitting the road, ensure that your Highland Roof Bag is properly closed. Zipper the bag closed all the way around, ensuring that there are no gaps or openings. This will prevent any water, dirt, or debris from entering the bag and damaging your belongings during your trip.
Ensuring all zippers are fully closed
Take a moment to check that all zippers on your Highland Roof Bag are fully closed and secured. Run your hand along the zippers to confirm that they are properly aligned and engaged. This will provide peace of mind and eliminate any concerns about potential zipper failure during your journey.
Securing any excess material or straps
If your Highland Roof Bag has any excess material or straps, secure them properly to prevent wind resistance or flapping during your trip. Use bungee cords, Velcro straps, or any other appropriate fastening method to keep the excess material or straps neatly secured. This will maintain a clean and aerodynamic profile, minimizing any noise or drag while driving.
Step 8: Testing the Roof Bag
Shaking the bag to ensure it doesn’t shift or move
Before embarking on your journey, give the Highland Roof Bag a gentle shake to ensure that it is securely attached and does not shift or move. If you notice any movement or instability, revisit the previous steps and double-check the installation. It’s crucial to have a stable and secure roof bag to avoid any accidents or damage to your vehicle or belongings.
Driving a short distance to check for any noises or instability
To further test the installation, drive a short distance to check for any unusual noises or signs of instability. Listen for any rattling or flapping sounds that may indicate an issue with the roof bag’s attachment. Pay attention to the vehicle’s handling and stability, ensuring that the roof bag does not affect its performance.

This image is property of www.roofbag.com.
Step 9: Additional Tips and Considerations
Avoiding overloading the roof bag
While roof bags provide valuable extra storage, it’s essential to avoid overloading them. Adhere to the manufacturer’s recommended weight limit and distribute the load evenly to prevent strain on the roof rack and the bag itself. Overloading can affect the vehicle’s handling, fuel efficiency, and overall safety.
Protecting the bag from harsh weather conditions
During your journey, your Highland Roof Bag may be exposed to various weather conditions. To protect it from rain, snow, or extreme sunlight, consider using a waterproof cover or tarp. This additional layer of protection will ensure that your belongings stay dry and secure throughout your trip.
Regularly checking the straps for any signs of wear
To maintain the integrity of your Highland Roof Bag installation, regularly inspect the straps for any signs of wear or damage. Check for fraying, tearing, or stretching, and replace any worn-out straps immediately. Regular maintenance will ensure that your roof bag remains securely attached and reliable for future trips.
Conclusion
Installing a Highland Roof Bag is a straightforward process that can provide valuable extra storage space for all your travel needs. By following this step-by-step guide, you can enjoy a hassle-free installation, ensuring a safe and secure journey. From choosing the right roof rack to properly securing the bag, each step plays a crucial role in a successful installation. So, gear up for your next adventure with confidence, knowing that your Highland Roof Bag is ready to carry your belongings safely and securely.

This image is property of i.ytimg.com.